Colorway Moto Wrap

Motorcycle Fairing Wrap
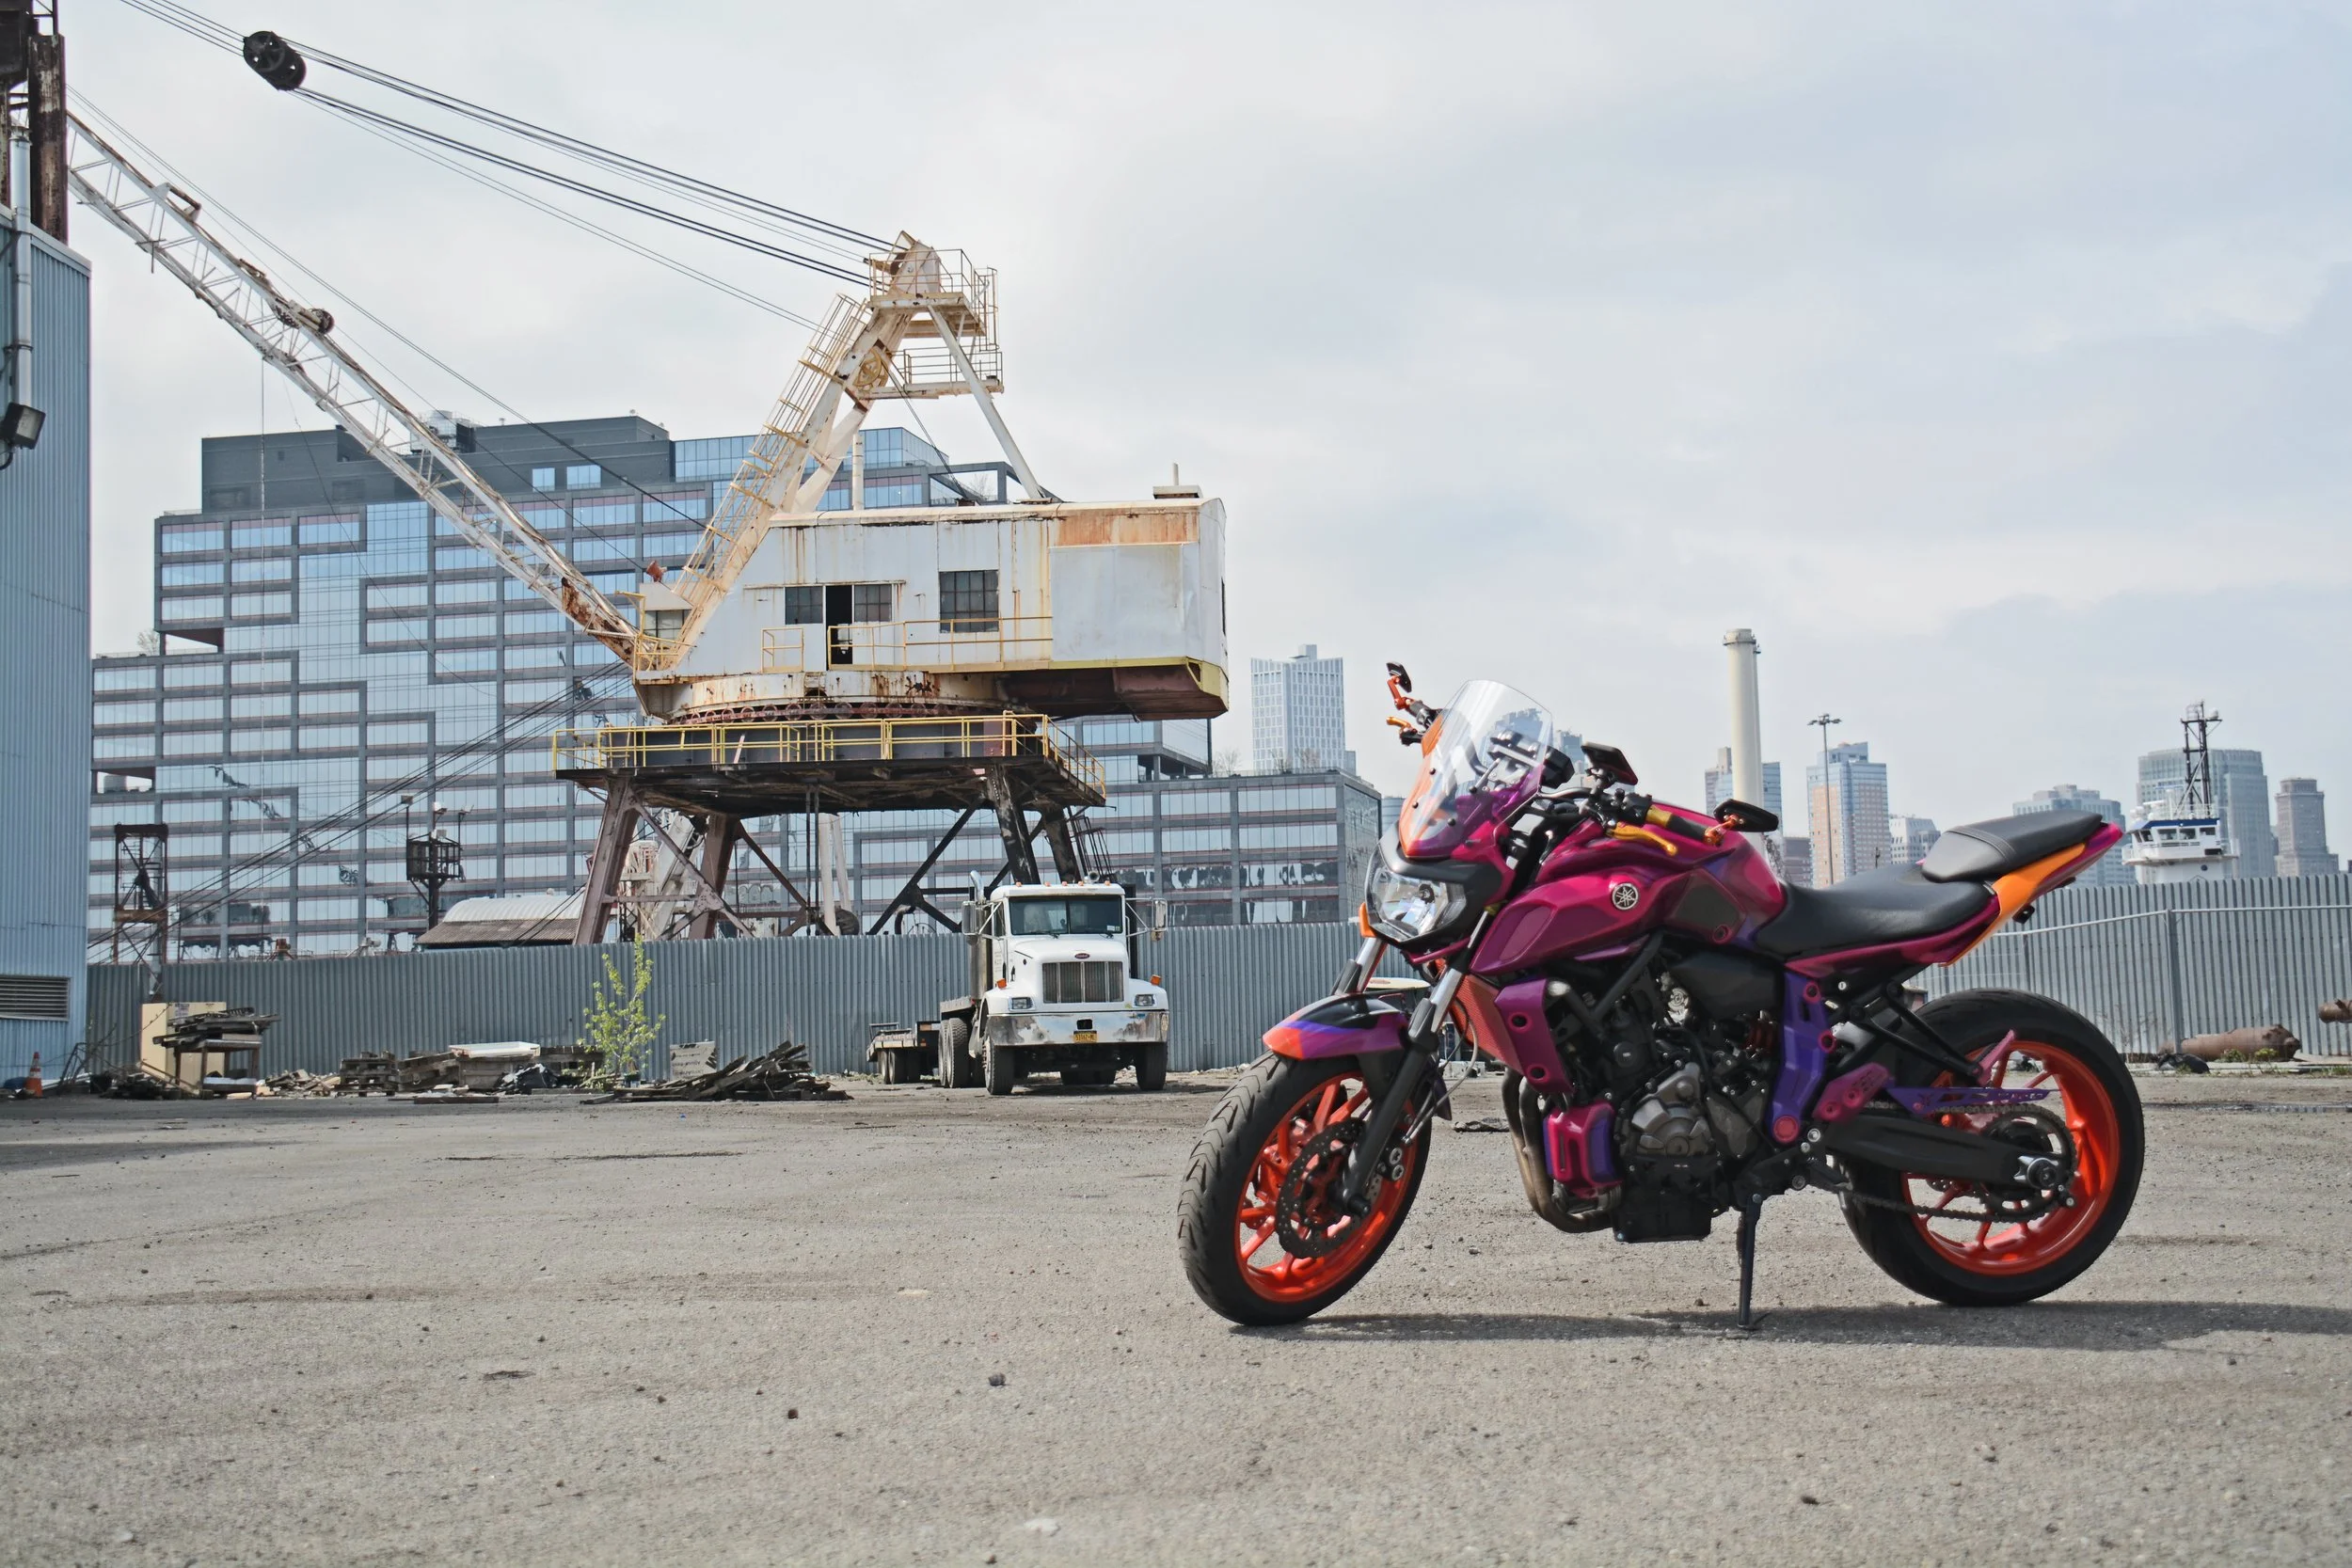
I love this motorcycle - My 2020 Yamaha MT-07!
—> not for how it looks, but WHAT IT IS.
However, the grey and black coloring of the OEM fairings did not represent how this bike makes me feel: it felt very masculine and bland, and when I look at the bike to ride, I think FUN, I think FUUUUNNNN… and the bike look from the manufacturer did not embody the concept of FUN.

I am personally a fairly reserved, only gregarious when I feel comfortable - thus, this wrap design, this impetus, to modify the bike, it is about it… the bike - how it behaves - as it should look as it feels/behaves.
I thought about colors and concepts, and as with any design, apply some logical rule sets in the design, and wham a thing is made...

I am not changing the from-yamaha-factory rim color and, as it happens am fond of that color.
This is where to start -> as this is the constant.
The orange of the rims is not a warm orange, it has hints of purples and cool-neon pinks. It is also deep, and has some crimson-like reds and oranges.
Thus, the two colors forming the wheel color made me decide to do two colorways (Purples and Pinks / Yellows and Oranges). To design with both color schemes would feel way too much/too busy…
I really appreciate cultivating the essence of things, (the color of the rims, the essence of the bike’s personality etc.) and applied the design to the forms upon which that design would be deployed.
WTF does that mean?
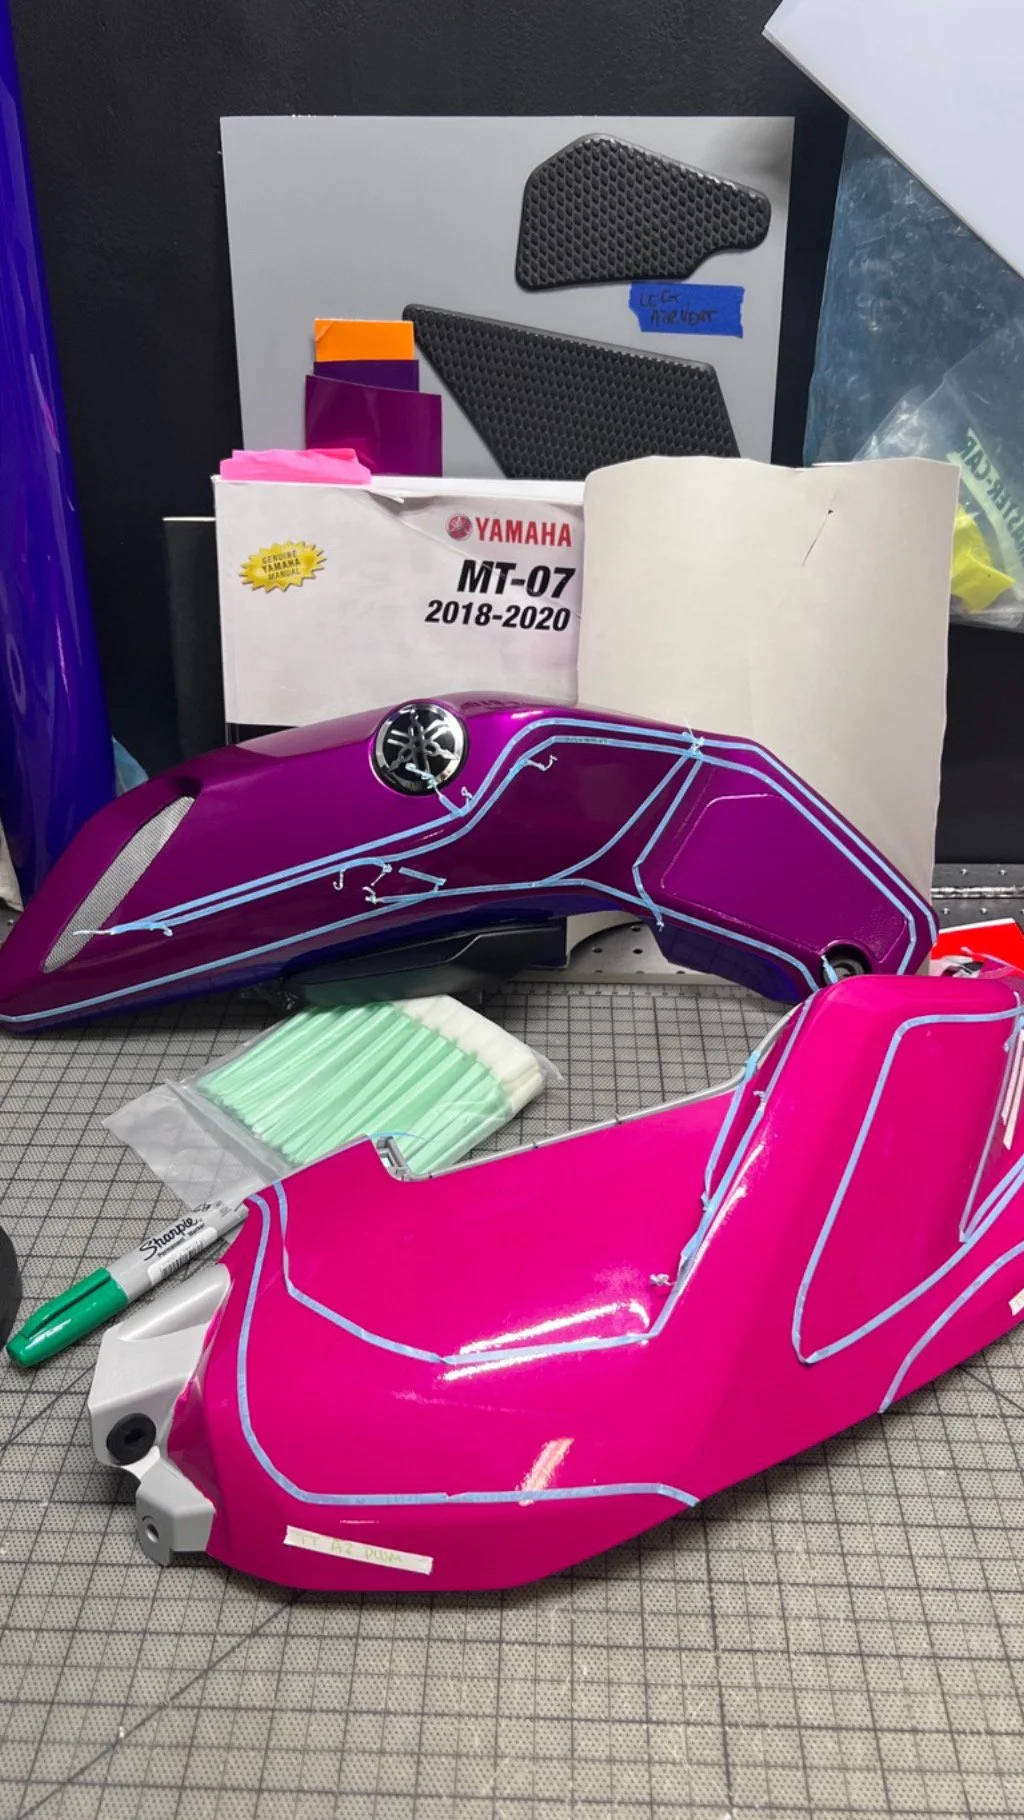
In short, I wanted to exaggerate and indicate the dimensionality of each shape of the fairing - to deepen the color of the recesses and highlight the color of the raised surfaces, and to apply a transitionary color to the two.
So I selected a base color as a deep color, a deeper color to further exaggerate any really deep recesses should it be required, and I selected a highlight color as the bright higher curve color. I then found Window Tint to apply which would marry the colors.
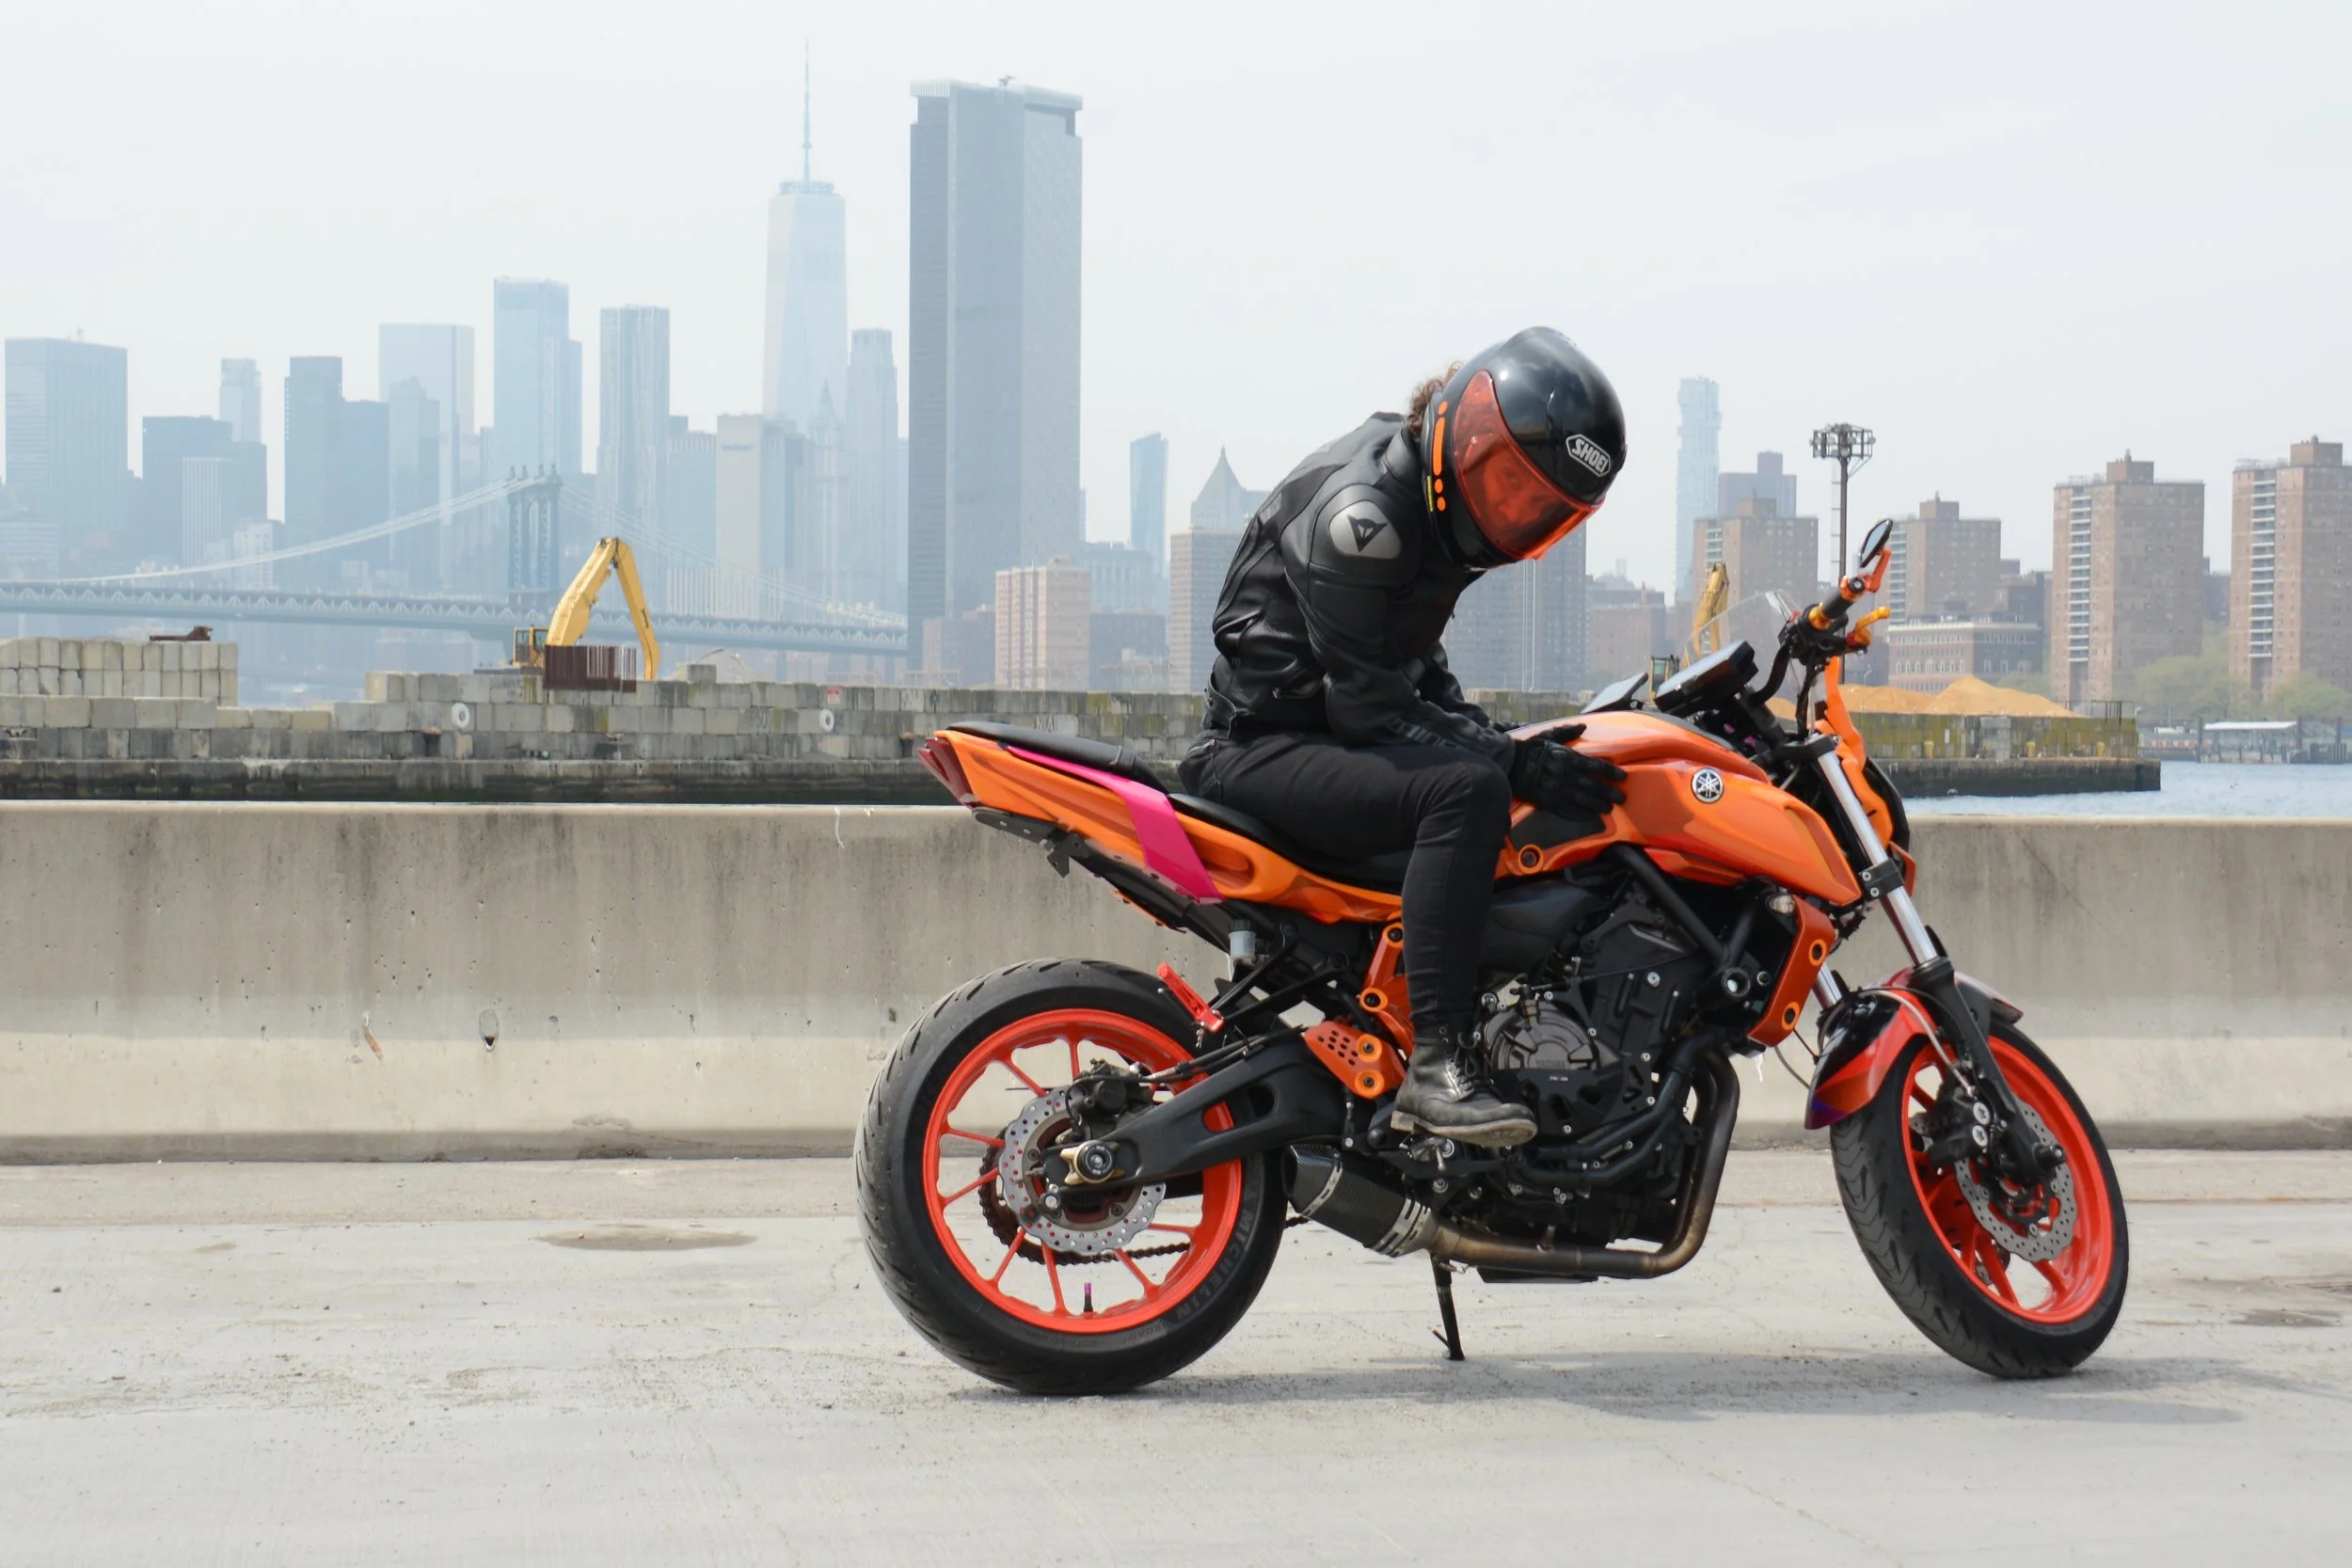
The left and right were bifurcated, Left side of the moto being a pink/purple and Right being yellow/orange. This was an arbitrary choice.


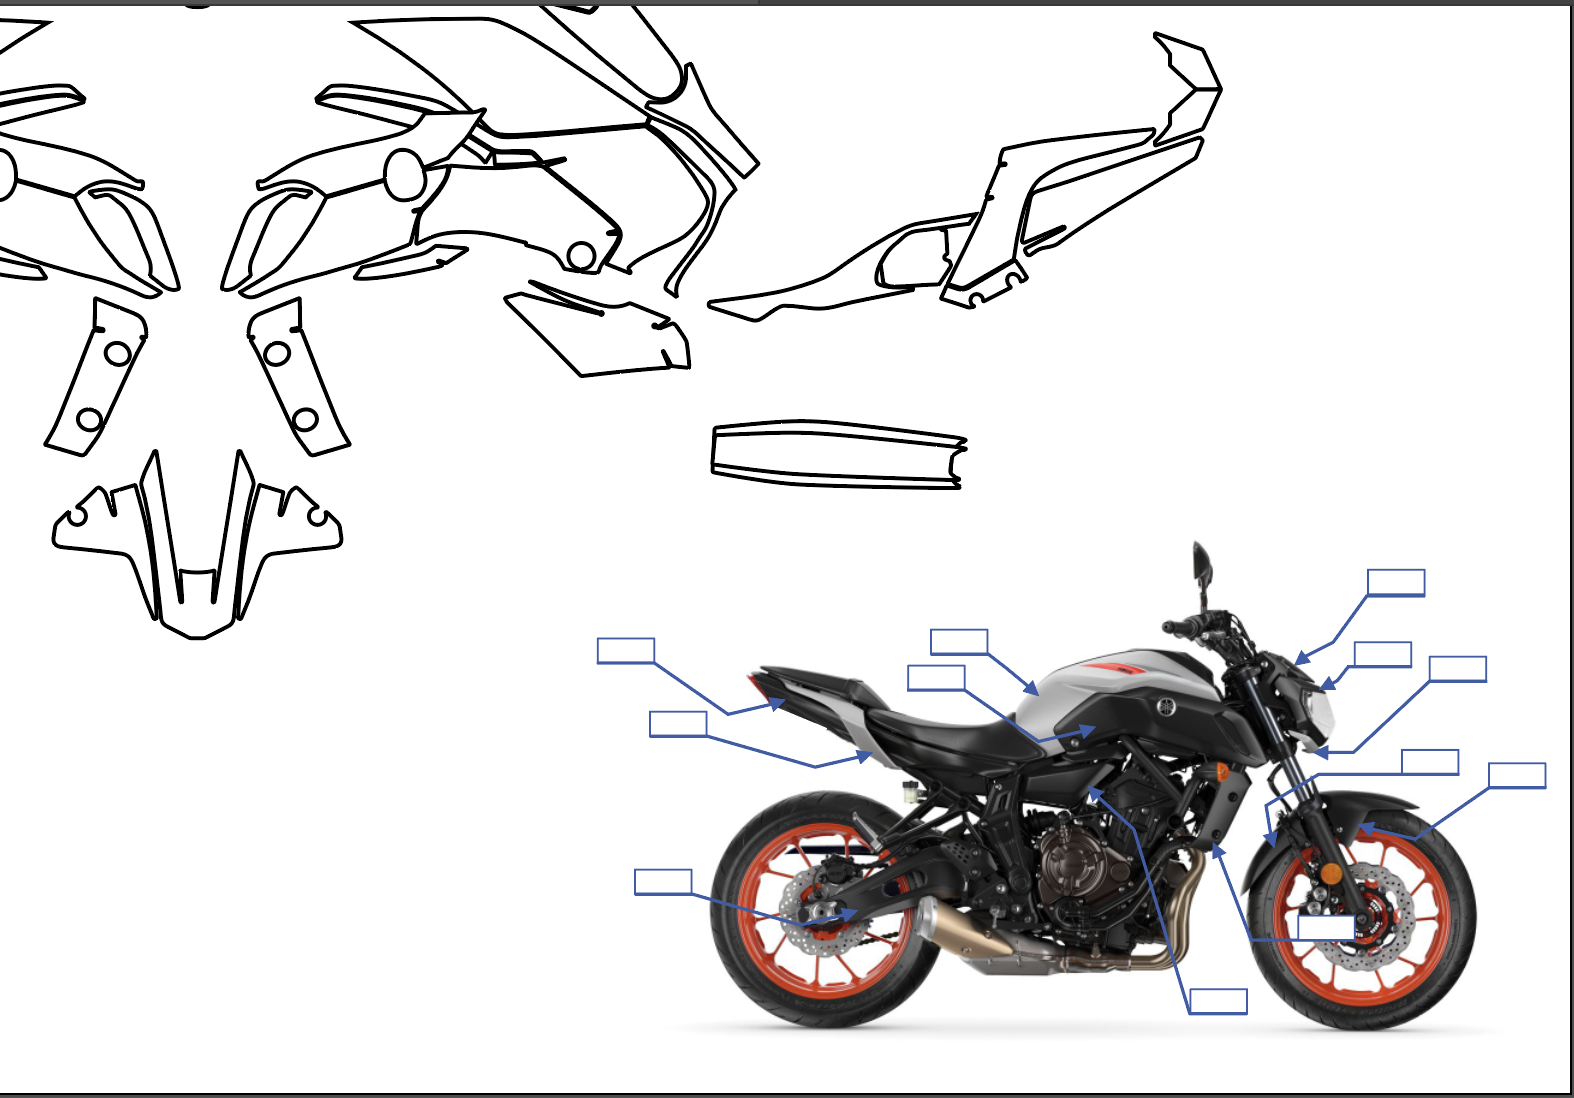
Planning the colors and the design
I purchased a Fairing Key for my bike off of EBay. Don’t do this.

Removed Left Side of Fairings from moto

Remove any decals and wash clean

labeled screws/and misc hardware, sandblasted so the paint will stay and painted these.

Base wrap a color

Trim and seal each layer
I wanted to trace the contours of the fairings and then emulate a cartoon-like effect of exaggerating the depth and the raised sections. So I traced the contours with tape.

An issue with material emulating wrap material. So I laid tin foil over the fairing and rubbed the taped lines to form a raised line semi-close in geometry to design.

I then laid the tin foil flat and traced the lines made onto tracing paper.

Vector Creation for CNC vinyl pattern cutting - I scanned the tracing paper with a cheap flatbed scanner, and then traced these lines, tidied them and gave them flair. The above image looks weird, as it is difficult to imagine the fairing literally wrapping around all of the dimensionality of the fairing.

Left side under seat fairing (laying the tint layer down)

Right side under seat fairing

Clear Coat the wrap when all laid out to seal it, and then several coats of Ceramic Coating to help prevent deterioration from abrasive interactions on the road.


I started with the Left side colorway (pinks/purples) and when recreating for the right side colorway (reds/oranges) the colors needed different designs - so I modified and added a few features to include an additional color layer.

These brackets would not stay adhered to the brackets’ recesses for bolts. Despite using a few pieces, adhesion promoter, heating the vinyl for stretchability, not heating the vinyl to retain the most adhesive qualities of the material. I ended up spray painting the recess as close as possible to the highlight colors for each side - to more or less success.


Treating the tank area as a single unit was easier to topcoat/spray clear than to do them individually, but this could be down to my discomfort with spray painting large curvaceous surfaces without overspray ((causing a matte surface finish) or without incurring drips - and there are both present to some degree all over the surface of the bike)).

The parts of the bike which merge both sides were the most interesting. The headlight assembly/ windscreen / front fender / radiator guard…. and deploying top stuff is bright stuff and bottom stuff is darker stuff - the fender is a merging of the deeper colors, and the headlight is wrapped in the brighter colors, and the windscreen… I used tint to merge the colors on every wrapped fairing - so it just made sense to use those.
the radiator cover seemed logical to me to paint, so I just merged some similar colors but did not do so in a rigid way…. a softer merging.


Caveat
I HAD to quell the perfectionist in me to be able to go riding. There are so many flaws and mistakes and imperfections all over the bike. I have to let them go, at least for this season, so I can go scoot around. Perhaps next winter I will redeploy some OCD wrapping skills to correct the things which stay bothering me and those which stop bothering me, means those are probably not see-able for most and are acceptable.
wrap/spray color/ rim touch up used:
HERE is a link to a repo of wrap colors and spray used for misc. colors
LEFT SIDE
Wrap
base color 3M™ Wrap Film Series 1080 - Gloss Fierce Fuchsia [3M]
tint/shade ORACAL® 8300 Transparent Calendered Film - Telemagenta [ORACAL]
highlight KPMF K75400 Gloss Momentum Pink Vinyl Wrap
Paint
RUST-OLEUM 347026 / Infra pink BLK400-IN40000 / Freak BLK400-3150 / Punk Pink BLK400-3145 / True Magenta BLK400-TR4000 / Purple Rain BLK400-3155
RIGHT SIDE
Wrap
base color 3M™ Wrap Film Series 2080 - Gloss Fiery Orange [3M]
Metallic Mid-Orange ESSMO™Coral Gloss Gold Orange Vinyl Wrap
tint/shade ORACAL® 8300 Transparent Calendered Film - Orange [ORACAL]
deep color3M™ Wrap Film Series 1080 - Gloss Hot Rod Red
highlight 3M™ Wrap Film Series 1080 - Gloss Bright Orange
Paint
Topaz BLK400-1050 / Halloween BLK400-2085 / Loop Pro Writing Tools -> Rosendhal 127
Finish
Ceramic Coating 3M CERAMIC COATING - 3M Part # 39901
Gloss Spray Rust-Oleum 7701830 Stops Rust Spray Paint, 12-Ounce, Gloss Crystal Clear
Max 2K Gloss as protectant for the top-most / most-to-be-imapacted by debris as a coating before the gloss spray above <it is a much more rigid/stiff substance>
For the front tire fender, I applied a very thin coat of 2 part clear epoxy to provide an even stronger layer of protection. This was not done to other fairings as it would require a good deal of OCD sanding to become optically clear and smooth, I don’t care so much that the fender looks super smooth but I don’t want to re-wrap it.